Excel Tip – Group Worksheets
Grouping is a really lovely feature that allows us to work with (or on) multiple sheets at the same time.
- This is a feature that will make a difference to you every day in Excel.
You can view the video or follow the step-by-step shown below.
Enjoy and remember: Keep it Simple!
Step 1 – Grouping multiple sheets
- Open a blank Excel Workbook.
- It will only have one sheet so quickly create five more sheets.
- To Group the first 3 sheets together, click on Sheet 1, hold down the SHIFT key on the keyboard, then click on Sheet 3.
- We can see that the tab names of all 3 sheets are white, which means they are all selected at the same time.

- To move all 3 together we can now click and hold down the click on any of the 3 selected tabs and drag them as a Group to the right of Sheet 6.
- Once we drop them, they automatically Ungroup.
Step 2 – Group Sheet 1 and Sheet 3 only
- Sheet 1 is already selected so we can hold down the CTRL key on the keyboard then click on the Sheet 3 tab.
- Click and hold down the click on either of the 2 tabs and drag them as a Group to the left of Sheet 4.

Isn’t that great!!
I use this not just to move sheets but to delete multiple sheets or hide multiple sheets etc.
- Let’s grab Sheet 2 and put it back between Sheets 1 and 3 to keep them in order.
Step 3 – Ungrouping
- We’ll start by Grouping the first four sheets together – so let’s click on Sheet 1 hold down the SHIFT key and click Sheet 4.
- If we have some Grouped and some Ungrouped sheets (as we have) then clicking on an Un-grouped sheet will remove the Grouping.
- But if all Sheets are Grouped – and let’s do that by clicking on Sheet 6, holding down the SHIFT key and clicking on Sheet 1 – then we don’t have an Ungrouped sheet to click on.
So we have to do it in a different way.
- We can right-click on any of the Grouped Sheets and from the shortcut menu choose Ungroup Sheets.

Step 4 – Practical Use of Grouping
Lastly I’m going to show you one of my favourite ways to use Grouping.
- Let’s click onto Sheet 1 hold down the SHIFT key and click on Sheet 6.
- Then click onto cell B2.
- Type in: Week 1 and Fill Handle (copy) across to Week 4.
- Then click onto cell A2.
- Type in: Product 1 – and Fill Handle down until it says Product 10.
- Let’s highlight cells B1 to E1 and we’ll put on Bold and Centre Alignment – as well.
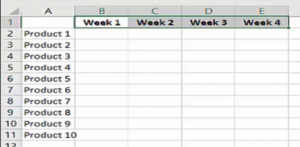
- Then let’s right-click on any one of the Sheet tabs and select Ungroup Sheets.
- If we now check each individual sheet we’ll see that they all have the exact same information on them!
Isn’t that just fantastic!
Step 5 – Edit Grouped Sheets
- We’ve just noticed that Column A needs to be widened.
- Rather than do that individually on each sheet – let’s Group them together and widen it once.
- Then Ungroup those sheets so we can check that it has indeed happened on each sheet.
So when we Group sheets together, what we do on one sheet, will also be done on the others.

Been looking for these exact instructions, saved me a lot of heartache, cheers
So useful, thank you